The basics of injection moulding?
Simply put Injection moulding is the process of injecting molten plastic into the desired shape of the mould cavity. When the plastic is allowed to solidify, you have your finished product.
Advantages:
- Complex 3D designs can be produced.
- Repeatable quality.
- Suitable for mass production.
- Array of different surface textures are achievable.
- Large range of product sizes.
- Short cycle times.
- Large range of plastic materials available with different properties.
Disadvantages:
- Initial upfront cost can be high due to mould tooling investment.
- MOQ can be high.
- Poor ROI on small volume.
- Flexibility for design iteration is limited.
The basic 3 phases of injection moulding:
1. DFM (Design for manufacturing).
2. Mould (Tooling) design & Manufacture.
3. Injection Trials.
1. DFM:
Once the initial ID/concept of the product has been confirmed the next stage is working with manufacturing engineers and tooling engineers to analyse the design and see if there will be any problems for injection moulding or assembly. The DFM engineering team at itch would go through your design with a fine tooth comb using experience and technical understanding to present where compromises might need to be made to make sure that the product will be efficient to produce.
2. Mould design & Manufacture
After the DFM stage the design then gets submitted to the tooling design department and the tool design can begin. In this phase the tooling will be assembled digitally in CAD and the core and cavity designed for the inverse of the product shape. Depending on how complex your part is sometimes tooling design can take a few weeks with hot runners and multiple slides being sourced and integrated. Moulds can be made of a number of materials. Some listed below.
- Hardened steel
- Pre-hardened steel
- Aluminium
- Beryllium-Copper alloy
Once the design is complete the mould can be manufactured using a variety of techniques. Skimming, EDM, CNC, and Wire erosion are some. Moulds can take from 2 weeks to 10 weeks to manufacture.
3. Injection trials
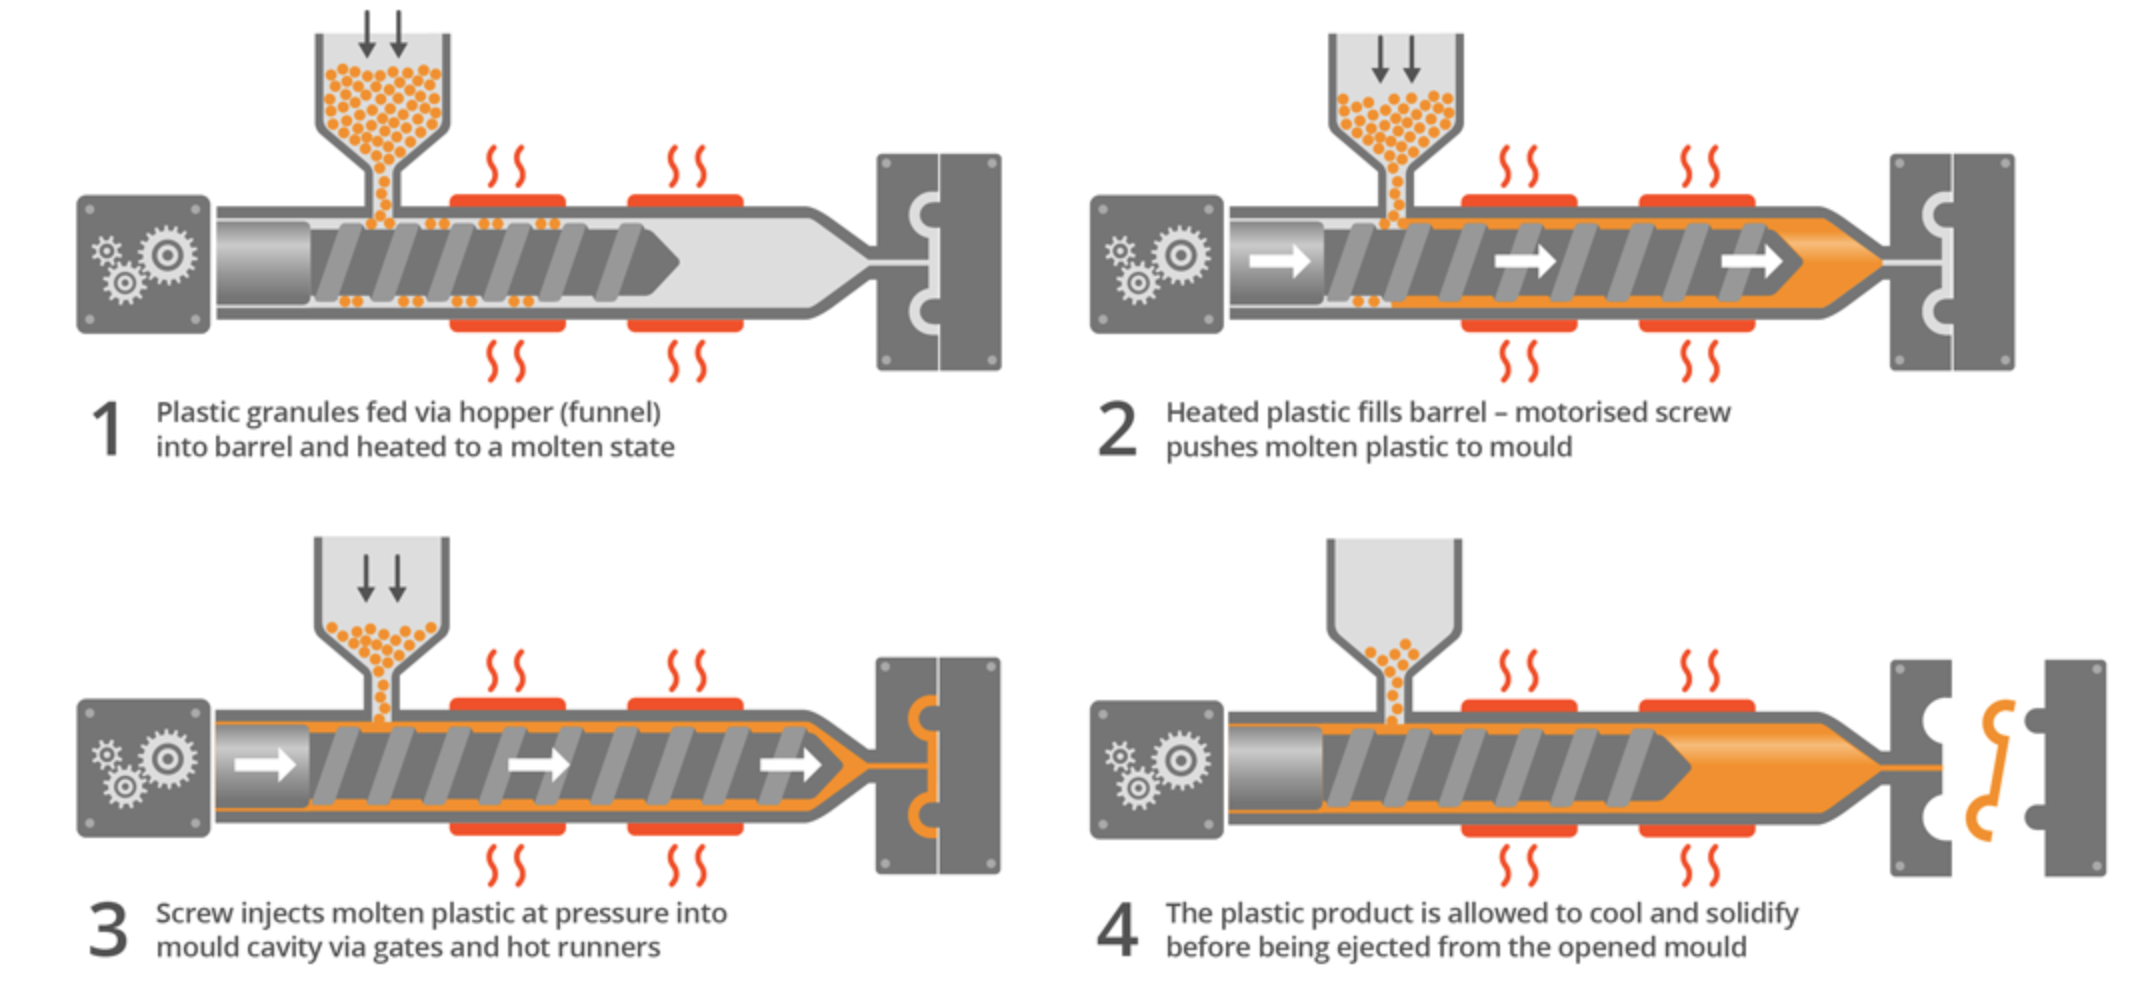
Once the mould has been made is where things start to get really technical! The four key stages of the process are:
- Thermoset or thermoplastic material in granular form is fed through a hopper into a heating barrel. This is where the magic happens!
- Then we spice things up, with the plastic heated to a predetermined temperature and driven by a large screw through the gate(s) and into the mould.
- Once the mould is filled, the screw will remain in place to apply appropriate pressure for the duration of a predetermined cooling time. Very cool!
- Upon reaching this point, the screw is withdrawn, the mould opened, and the part ejected. The gates will either shear off automatically or be manually removed. Easy, right?

Injection moulding cycle:
- Clamping: The mould contains two halves of core and cavity. They must be securely closed by the clamping unit. One half is fixed and another is able to slide. The hydraulically powered clamping unit exerts enough force to keep the mould securely closed while the material is injected. The time required to close is dependent upon machine type.
- Injection: The raw plastic material, usually in the form of pellets is fed to the injection moulding machine by the injection unit. During this process the material is melted by heat and pressure from the feeding screw. The molten plastic is then injected into the mould very quickly and a build-up of pressure packs and holds the material. The amount of material injected is called a shot. The time required to inject the molten plastic is difficult to calculate accurately due to the complex and shifting flow of the molten plastic into the mould. However, the injection time can be estimated by the shot volume, injection pressure and injection power.
- Cooling: Molten plastic kept inside the mould is let to cool when it contacts inner surfaces of mould. As the plastic cools, it will solidify into the shape of the desired part. The mould cannot be opened until the required cooling time has elapsed. The cooling time can be estimated from several thermodynamic properties of the plastic and the maximum wall thickness of the part.
- Ejection: After enough time has passed, the cooled part may be ejected from the mould by the ejection system, which is attached to the rear half of the mould. When the mould is opened, a mechanism is used to push the part out of the mould. Force must be applied to eject the part, because during cooling the part shrinks and adheres to the mould. In order to facilitate the ejection of the part, a mould release agent can be sprayed onto the surfaces of the mould cavity prior to injection of the material. The time that is required to open the mould and eject the part can be estimated from the dry cycle time of the machine and should include time for the part to fall free of the mould. Once the part is ejected, the mould can be clamped shut for the next shot to be injected.

